Part-II: How Replication Works In MySql

In the first part of this blog-post series, we looked at the theoretical side of how replication works, in this blog post, we will set up replication and see all the components involved in the replication process, what tables keep the metadata about the replication process, what causes replication lag and much more. We will be using Docker and MySQL-8.0 for our setup.
Replication Setup:
We will start with pulling the MySQL docker image, and we will set up 2 replicas with 1 master server configuration.
➜  ~ docker pull mysql/mysql-server:8

➜  ~ docker run -d --rm --name=master --hostname=master -v $PWD/master:/var/lib/mysql -e MYSQL_ROOT_PASSWORD=pass mysql/mysql-server:8.0 --server-id=1 --log-bin='mysql-bin-1.log'
➜  ~ docker run -d --rm --link=master --name=replica1 --hostname=replica1 -v $PWD/replica1:/var/lib/mysql -e MYSQL_ROOT_PASSWORD=pass mysql/mysql-server:8.0 --server-id=2
➜  ~ docker run -d --rm --link=master --name=replica2 --hostname=replica2 -v $PWD/replica2:/var/lib/mysql -e MYSQL_ROOT_PASSWORD=pass mysql/mysql-server:8.0 --server-id=3
➜ ~ docker ps
CONTAINER ID IMAGE COMMAND CREATED STATUS PORTS NAMES
7fc8ebbad659 mysql/mysql-server:8.0 "/entrypoint.sh --se…" 6 seconds ago Up 6 seconds (health: starting) 3306/tcp, 33060-33061/tcp replica2
6b6fa6e6fbf7 mysql/mysql-server:8.0 "/entrypoint.sh --se…" 12 seconds ago Up 11 seconds (health: starting) 3306/tcp, 33060-33061/tcp replica1
13f01a96bedb mysql/mysql-server:8.0 "/entrypoint.sh --se…" 21 seconds ago Up 20 seconds (health: starting) 3306/tcp, 33060-33061/tcp masterAs of now, we are running a total of 3 MySQL servers and although they are named master, replica1, and replica2, there is no replication going on. Let's configure our master and replicas to replicate now.
➜  ~ docker exec -it master mysql -uroot -ppass \
  -e "CREATE USER 'replicationUser'@'%' IDENTIFIED WITH mysql_native_password BY 'replicationPass';" \
  -e "GRANT REPLICATION SLAVE ON *.* TO 'replicationUser'@'%';" \
  -e "SHOW MASTER STATUS;"

mysql: [Warning] Using a password on the command line interface can be insecure.
+--------------------+----------+--------------+------------------+-------------------+
| File               | Position | Binlog_Do_DB | Binlog_Ignore_DB | Executed_Gtid_Set |
+--------------------+----------+--------------+------------------+-------------------+
| mysql-bin-1.000005 |      708 |              |                  |                   |
+--------------------+----------+--------------+------------------+-------------------+
We have created a new user on master and given it the privilege of REPLICATION SLAVE, please note that any account can be used for this operation, providing it has been granted the REPLICATION SLAVE privilege. Creating a new user for replication is recommended as the user having replication slave privilege's password is saved as plain text in mysql.slave_master_info table.
Now, let's configure replica1 and replica2 to connect to master.
################## For replica 1 ###########################
➜  ~  docker exec -it replica1 mysql -uroot -ppass \
  -e "CHANGE MASTER TO MASTER_HOST='master', MASTER_USER='replicationUser', MASTER_PASSWORD='replicationPass', MASTER_LOG_FILE='mysql-bin-1.000005';" \
  -e "SHOW SLAVE STATUS\G;"

################## For replica 2 ###########################
➜  ~  docker exec -it replica2 mysql -uroot -ppass \
  -e "CHANGE MASTER TO MASTER_HOST='master', MASTER_USER='replicationUser', MASTER_PASSWORD='replicationPass', MASTER_LOG_FILE='mysql-bin-1.000005';" \
  -e "SHOW SLAVE STATUS\G;"
➜  ~docker exec -it replica1 mysql -uroot -ppass -e "SHOW SLAVE STATUS\G"
mysql: [Warning] Using a password on the command line interface can be insecure.
*************************** 1. row ***************************
               Slave_IO_State: Waiting for source to send event
                  Master_Host: master
                  Master_User: replicationUser
                  Master_Port: 3306
                Connect_Retry: 60
              Master_Log_File: mysql-bin-1.000005
          Read_Master_Log_Pos: 1003
               Relay_Log_File: replica1-relay-bin.000002
                Relay_Log_Pos: 1222
        Relay_Master_Log_File: mysql-bin-1.000005
             Slave_IO_Running: Yes
            Slave_SQL_Running: Yes
              Replicate_Do_DB:
          Replicate_Ignore_DB:
           Replicate_Do_Table:
       Replicate_Ignore_Table:
      Replicate_Wild_Do_Table:
  Replicate_Wild_Ignore_Table:
                   Last_Errno: 0
                   Last_Error:
                 Skip_Counter: 0
          Exec_Master_Log_Pos: 1003
              Relay_Log_Space: 1434
              Until_Condition: None
               Until_Log_File:
                Until_Log_Pos: 0
           Master_SSL_Allowed: No
           Master_SSL_CA_File:
           Master_SSL_CA_Path:
              Master_SSL_Cert:
            Master_SSL_Cipher:
               Master_SSL_Key:
        Seconds_Behind_Master: 0
Master_SSL_Verify_Server_Cert: No
                Last_IO_Errno: 0
                Last_IO_Error:
               Last_SQL_Errno: 0
               Last_SQL_Error:
  Replicate_Ignore_Server_Ids:
             Master_Server_Id: 1
                  Master_UUID: f329dfab-6a5d-11ec-8e93-0242ac110002
             Master_Info_File: mysql.slave_master_info
                    SQL_Delay: 0
          SQL_Remaining_Delay: NULL
      Slave_SQL_Running_State: Replica has read all relay log; waiting for more updates
           Master_Retry_Count: 86400
                  Master_Bind:
      Last_IO_Error_Timestamp:
     Last_SQL_Error_Timestamp:
               Master_SSL_Crl:
           Master_SSL_Crlpath:
           Retrieved_Gtid_Set:
            Executed_Gtid_Set:
                Auto_Position: 0
         Replicate_Rewrite_DB:
                 Channel_Name:
           Master_TLS_Version:
       Master_public_key_path:
        Get_master_public_key: 0
            Network_Namespace:
Now, that we have set up replication, let's write something on master and see if the same is available on replica or not. In the below example, we are creating a TEST database on master and we can see, that the same is available on replica as well.
➜  ~ docker exec -it master mysql -uroot -ppass \
  -e "CREATE DATABASE TEST; SHOW DATABASES;"
mysql: [Warning] Using a password on the command line interface can be insecure.
+--------------------+
| Database           |
+--------------------+
| information_schema |
| mysql              |
| performance_schema |
| sys                |
| TEST               |
+--------------------+

➜  ~ docker exec -it replica1 mysql -uroot -ppass \
  -e "SHOW DATABASES;"
mysql: [Warning] Using a password on the command line interface can be insecure.
+--------------------+
| Database           |
+--------------------+
| information_schema |
| mysql              |
| performance_schema |
| sys                |
| TEST               |
+--------------------+
Components Involved In Replication:
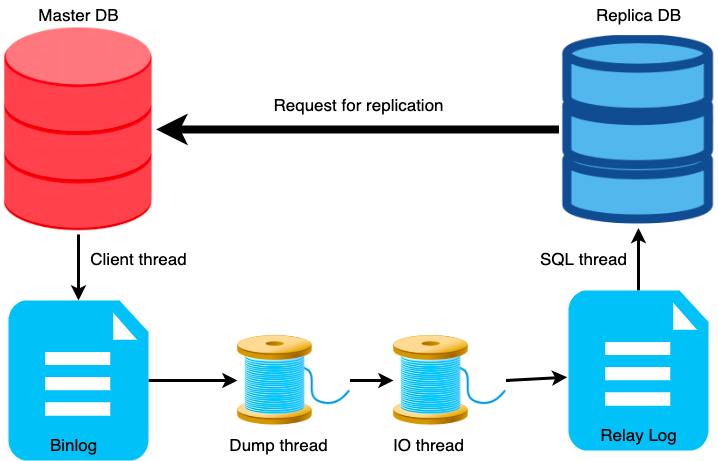
In the first part of the blog, we talked about binlog and relay-log, well now let's see how they look like in real life. We have sshed into both master and replica and did cat on binlog and relay log respectively. Please note, that the content of the logs is unreadable.
bash-4.4# cat mysql-bin-1.000005
abin�.�ay}8.0.27�.�a


**4
: �Es�SYSTEMa#����0�n/�a"O��U����C�8ţ2�n/�a��
���CREATE USER 'replicationUser'@'%' IDENTIFIED WITH 'caching_sha2_password' AS '$A$005$%E3d]TBAx9XjbO/oJuMrFlDDADw7gAqsBInb08jJuuyHX3> �Es�dK4'�݂n/�a"M,�}����8-�n/�a��
      root	localhost
                         mysql�GRANT REPLICATION SLAVE ON *.* TO 'replicationUser'@'%'>M��5�a"O��JK���%�8Ս�~�5�a��M: �Es�SYSTEM
��ALTER USER 'replicationUser'@'%' IDENTIFIED WITH 'mysql_native_password' AS '*5C7E06A42DB3E10420C5E764E64D71351B57BD49'sgbash-4.4# cat replica1-relay-bin.000002
abin"6�ay}@8.0.27
**4
(=
a�"6�a#��x��C1 mysql-bin-1.000005k>�y�.�ay}8.0.27�.�a
**4
(�5 �"6�a1�mysql-bin-1.000005�
: �Es�SYSTEM���C�8ţ2�n/�a��
���CREATE USER 'replicationUser'@'%' IDENTIFIED WITH 'caching_sha2_password' AS '$A$005$%E3d]TBAx9XjbO/oJuMrFlDDADw7gAqsBInb08jJuuyHX3OyoV/QEK4'�݂n/�a"M,�}����8-�n> �Es�d
root localhost
mysql�GRANT REPLICATION SLAVE ON *.* TO 'replicationUser'@'%'>M��5�a"O��JK���%�8Ս�~�5�a��M: �Es�SYSTEM
��ALTER USER 'replicationUser'@'%' IDENTIFIED WITH 'mysql_native_password' AS '*5C7E06A42DB3E10420C5E764E64D71351B57BD49'sgWe know about the IO thread and the SQL thread on the replica's end. Now, there are tables on the replica, which contain the metadata information about these threads.
The mysql.slave_master_info table contains the metadata information of the connection created between the replica and the source database. Remember, we mentioned, that we should use a different user for replication because the password is saved as plain text, we can see that in slave_master_info table.
➜  ~ docker exec -it replica1 mysql -uroot -ppass \
  -e "use mysql;" \
  -e "select * from slave_master_info\G"
mysql: [Warning] Using a password on the command line interface can be insecure.
*************************** 1. row ***************************
                Number_of_lines: 33
                Master_log_name: mysql-bin-1.000005
                 Master_log_pos: 156
                           Host: master
                      User_name: replicationUser
                  User_password: replicationPass
                           Port: 3306
                  Connect_retry: 60
                    Enabled_ssl: 0
                         Ssl_ca:
                     Ssl_capath:
                       Ssl_cert:
                     Ssl_cipher:
                        Ssl_key:
         Ssl_verify_server_cert: 0
                      Heartbeat: 30
                           Bind:
             Ignored_server_ids: 0
                           Uuid: f329dfab-6a5d-11ec-8e93-0242ac110002
                    Retry_count: 86400
                        Ssl_crl:
                    Ssl_crlpath:
          Enabled_auto_position: 0
                   Channel_name:
                    Tls_version:
                Public_key_path:
                 Get_public_key: 0
              Network_namespace:
   Master_compression_algorithm: uncompressed
  Master_zstd_compression_level: 3
               Tls_ciphersuites: NULL
Source_connection_auto_failover: 0
                      Gtid_only: 0
Similarly, mysql.slave_relay_log_info table contains the metadata information about the SQL thread which reads the relay log and applies those transactions on the replica.
➜  ~ docker exec -it replica1 mysql -uroot -ppass \
  -e "use mysql;" \
  -e "select * from slave_relay_log_info\G"
mysql: [Warning] Using a password on the command line interface can be insecure.
*************************** 1. row ***************************
                             Number_of_lines: 14
                              Relay_log_name: ./replica1-relay-bin.000002
                               Relay_log_pos: 1222
                             Master_log_name: mysql-bin-1.000005
                              Master_log_pos: 1003
                                   Sql_delay: 0
                           Number_of_workers: 4
                                          Id: 1
                                Channel_name:
                   Privilege_checks_username: NULL
                   Privilege_checks_hostname: NULL
                          Require_row_format: 0
             Require_table_primary_key_check: STREAM
 Assign_gtids_to_anonymous_transactions_type: OFF
Assign_gtids_to_anonymous_transactions_value:
Replication Lag:
Replication lag is caused when either the I/O Thread or SQL Thread cannot keep up with the ingestion from the source database.
It is rarely the case, that the IO thread is causing the issue. If the I/O Thread is suffering, this means that the network connection between the master and slave is slow. We should consider enabling the slave_compressed_protocol to compress network traffic from source to replica.
If the SQL thread is lagging, then there could be broadly 2 issues, we first need to categorize the issue and we need to find out if the replication is more CPU-bound or I/O-bound. Generally speaking, if we increase resources on the replica, these issues should be mitigated, however, we should first check the nature of the problem before proceeding with any solution.
Now, the obvious question would be: how would we know, whether it's an I/O thread issue or SQL thread issue? Well, MySQL has got us covered, with only show master status and show slave status, we can calculate which thread is becoming the bottleneck. The calculation is explained pretty well in this blog, so I am not going to show the calculation, please read this blog for the calculation. https://blogs.oracle.com/mysql/post/what-causes-replication-lag
Conclusion:
In this blog, we set up replication from scratch and we saw different components involved in the whole replication process.
- While setting up replication, use a different user and don't grant any other privilege to that user apart from
REPLICATION SLAVE. - Replication lag happens when either the IO thread or the SQL thread could not keep up with the ingestion rate of data from the source data.
Note: All the commands used in the blog have also been added in a github gist and link has been shared below..
 Rahul Mishra
 262588213843476
 Muhammad Irfan